Table of Contents
In this post, we will guide you on how to integrate the robot framework plugin in Jenkins.
What is a Jenkins server?
Software development, testing, and deployment processes can be automated with the aid of Jenkins, an open-source automation server. By automating the whole software delivery pipeline, it supports continuous delivery (CD) and continuous integration (CI) methodologies. Jenkins makes it possible for developers to continuously incorporate changes into the project, which helps to identify issues early in the development cycle and facilitates the integration of new code. With preset configurations, timetables, or triggers, the Jenkins server offers a centralized platform for automating different software development and delivery processes.
To know more about Jenkins Setup and usage, Please check https://dasfascination.com/what-is-jenkins-server/
Overview: Robot Framework
The generic open-source Robot Framework test automation framework provides an easy-to-use, keyword-driven approach to automation. Users can write high-level test cases with it, which are easily transformed into machine-executable automation scripts. It is developed in Python. The framework includes a wide range of libraries and tools that enable it to be used for functional, unit, and acceptance testing, among other forms of testing.
Among Robot Framework’s primary characteristics are:
Keyword-driven testing makes tests easily legible and understood for both technical and non-technical users by using keywords in a tabular manner.
Robot Framework’s extensibility: Users can build additional libraries in Python or other supported languages to expand the framework’s functionality to suit their needs.
Built-in Libraries: Testers may write tests without having to construct new libraries for common tasks because it comes with a robust set of standard libraries for a variety of purposes, including file operations, string manipulation, and HTTP queries.
Test Data-Driven: The Robot Framework facilitates data-driven testing, which allows test cases to be run using multiple input data sets to verify a range of situations.
Support for Integration: It offers smooth integration with many frameworks and technologies, such as Jenkins for continuous integration, Selenium WebDriver for web testing, and Appium for mobile testing.
Cross-Platform: Robot Framework is compatible with a variety of operating systems, including Linux, macOS, and Windows.
All things considered, Robot Framework is a flexible and easy-to-use automation framework that makes the process of developing and running automated testing for software programs simpler.
Prerequisite:
The Jenkins server should be installed and started.
If Jenkins is setup only as a master node, the robot framework needs to be installed in the Jenkins server system. If Jenkins is configured with a slave architecture, the robot framework installation on the slave system is sufficient.
Robot Framework Plugin Installation:
We need the Robot Framework Plugin to publish script results so that they are viewable in the Jenkins UI.
- Log in to Jenkins Server as an admin.
- Go To Manage Jenkins-> Plugins -> Available Plugins

- Search for the ‘Robot Framework’ plugin and install it.

Sample Project Configuration Steps:
- Create a freestyle sample project in Jenkins to verify the robot results.

- Configure this project. Give a description.

- Source code management as None. If you want to add the GitLab repository to the source code management, please refer to another post. https://dasfascination.com/jenkins-server-version-control/
- Add the build step “Execute Windows batch command,” assuming Jenkins is running on the Windows system.

In this build step Mention the command needed to execute the case from robot script or all the cases e.g.
robot -t “<test_case_name>” <test_file_name>
- Choose “Publish Robot Framework test results.” In the “Post Build Action” section

- To display the captured screenshot in the log.html file, Add ‘**/*.png,**/*.jpg,**/*.jpeg ‘ in Post-build Actions -> Publish Robot Framework test results -> Advance section -> Other files to copy
- Click on Apply and Save
Sample Project Build Steps:
- Build the project using the “Build Now” command.

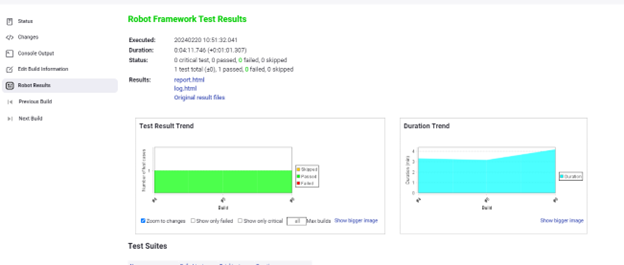
- Click on the build job, and after completion, the result will display as below.

- On clicking Robot Results below, a window with the link of all the results will be displayed

- You may get an error like ‘Javascript ….’ on opening any result file like ‘log.html’, ‘report.html’
- To view the result file from the Jenkins UI, you need to update the security policy of Jenkins.
- To learn more on this, please visit Jenkins_site
- To customize the Security policy in Jenkins, go to Manage Jenkins -> Script Console
- type “System.setProperty(“hudson.model.DirectoryBrowserSupport.CSP”, “”)” and execute the Run button.

- Now again, try to open the results file like ‘log.html’ from the ‘Robot Results’ window of the running job. You can open the file now.
Jenkins offers consolidated reporting on the outcomes of Robot Framework tests. Jenkins generates and presents test reports that make it simple for developers and other stakeholders to see the results of the tests, pinpoint any errors, and monitor the execution of the tests over time. You can build other different project styles like pipelines, using Jenkins and the Robot Framework.


