Table of Contents
Introduction to Role-Based Security Authorization
Authorization plays a crucial role in Jenkins security by controlling user access to various Jenkins resources, such as jobs, nodes, and administrative functions. Using Jenkins, role-based security authorization offers a scalable and adaptable way to manage access according to user roles.
A security approach called role-based access control, or RBAC, allocates roles to individuals or groups and defines them, each with a set of rights. Jenkins uses its matrix-based security authorization strategy plugin to implement RBAC, giving administrators the ability to create granular access controls.
Steps to Configure Jenkins to Grant Role-Based Authorization
Jenkins makes it simple to start using role-based security authorization. The first step is to install and setup Jenkins Server and then login to Jenkins Server from a browser using admin privileges.
Installation of plugin
Go to Manage Jenkins -> Plugins -> Installed plugins and search for ‘Matrix Authorization’. The below plugin should be visible. Install the plugin.

For details, visit https://plugins.jenkins.io/role-strategy/
User Creation for different roles
Go to Manage Jenkins > Users and click on ‘Create users.’

Now, Fill the form and create 2-3 users for developer, tester, and admin roles, etc.

Below is the Jenkins database with some sample users.

Configure an environment for users.
You can configure different environment for different users like theme, time zone, SSH public keys, etc. To set this, go to Dashboard -> People and select any user.

Click on configure and modify the parameters as per your wish.
Set authorization rules for different users.
Within Jenkins, user roles are collections of permissions. Assign roles to users according to the duties or obligations they have within the Jenkins environment. Users with particular roles have different permissions that dictate what they can do.
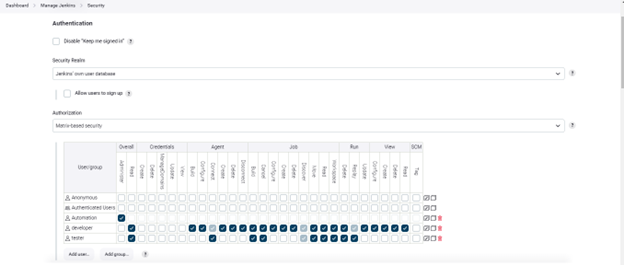
Go to Manage Jenkins > Security. In the ‘Security Realm’ dropdown of the ‘Authentication’ section, choose ‘Jenkins own user database. In the ‘Authorization’ section, choose ‘Matrix-based Security’
Now choose the roles as per the user access, like ‘Admin’. The user can do anything on the server, such as plugin installation, any policy change, etc. Developer role can create, view, execute Jobs, agents, etc. The tester role is only able to execute the created job and is not able to configure the job.
Below is an example of role selection as per the user.

Verify access for different users.
Admin User: Sign out and log in with an admin user credential. Verify you can do everything like any installation, configuration, user creation, etc.

Developer: Sign out and login as a developer. Verify you can create jobs but are able to access ‘Manage Jenkins.

Tester: Sign out and login as a tester. Verify you cannot create/configure jobs; you are only able to build/execute jobs.

Best Practice: Role-Based Access Control Strategies
To reduce the chance of unwanted access, abide by best practices like the least privilege principle. Roles and permissions should be reviewed and updated on a regular basis to reflect organizational changes and evolving requirements.
Give people the minimal number of permissions necessary to do their responsibilities to adhere to the principle of least privilege. Refrain from giving broad permissions and do frequent role audits to eliminate superfluous access.
By adhering to security best practices, such as updating Jenkins and plugins often, segmenting the network, and enforcing strong password regulations, you can strengthen the security of Jenkins. Keep an eye out for any unusual activity in the Jenkins logs and security events.


