Table of Contents
Introduction to Jenkins Theme Manager
Jenkins is an open-source continuous integration (CI) server. Jenkins server helps to automate the software development parts like building, testing, and deploying. Thousands of development teams use the widely used DevOps tool Jenkins.
Jenkins theme manager is a plugin that enhances the visual customization features of Jenkins Server. It lets users customize the Jenkins interface’s look to fit their needs and tastes. A variety of customization options are available through the plugin, such as altering the Jenkins interface’s layout components, colors, fonts, and icons. Users can modify these components to create a style and feel that complements their own tastes or the branding of their organization.
Exploration of different Jenkins theme-based plugins.
Let’s explore the different theme-based plugins available for the Jenkins server. The first step is to install and setup Jenkins Server and then login to Jenkins Server from a browser using admin privileges.
Default Installed Theme Based Plugins
Jenkins installation also installed default theme-based plugins.
Go to Manage Jenkins -> Plugins -> Installed Plugins and search for ‘theme’. The below plugins should be visible.

For details on Jenkins theme manager, visit https://plugins.jenkins.io/theme-manager/
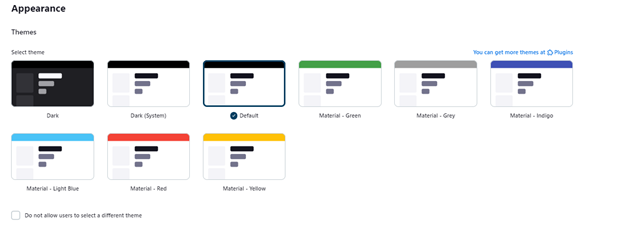
Now, check the different appearances with default theme-based plugins. Go to Manage Jenkins -> Appearances and choose the ‘Dark’ theme. You can immediately see the changes before applying the theme.

Exploration on more theme-based plugins
Go to Manage Jenkins -> Plugins -> Available Plugins and search for ‘theme’. The below plugins should be visible.

Simple Theme Plugin Exploration
Install ‘Simple Theme’ plugins and go to appearance to select the theme. The below section is now added to the ‘Appearance’ section. It helps customize Jenkin’s appearance with your own custom CSS (.css) and JavaScript (.js) file. It also allows you to replace the favicon.
The CSS URL option is already there, you can add other URLs from the ‘Add’ drop-down list.
The created file (.css/.js) needs to be placed in ‘userContent’ folder in Jenkins installed directory, e.g., C:\Users\<name>\.jenkins\userContent

If you just want to check the change rather than writing a .css or.js file, you can try to find already available URLs on internet, e.g., https://jenkins-contrib-themes.github.io/jenkins-material-theme/dist/material-teal.css
After applying this .css file, the looks will be changed as below

Login Theme Plugin Exploration
Login Theme helps to override the default theme for the login and signup pages on Jenkins.
Install ‘Login Theme’ plugins and go to appearance to select the theme. The below section is now added to the ‘Appearance’ section.
Follow the link: https://plugins.jenkins.io/login-theme/ and set the parameters, you will see the change in the login page as mentioned on this page.

On entering the branding, the login image will change as below:

Material Theme Plugin Exploration
Install ‘Material Theme’ plugins and go to appearance to select the theme. This is a very user-friendly theme, you do not need to write any.css or.js files to enable this theme. This theme changes the color and UI style of the Jenkins server.
The below section is now added to the ‘Appearance’ section.

Now choose and apply any color, and see the magic.
Solarized Theme Plugin Exploration
Install ‘Solarized Theme’ plugins and go to appearance to select the theme. 3 themes will be added. Choose any theme and see the changes.

Below is the style of the Jenkins server after choosing the ‘Solarized Dark’ theme.

Customizable Header
This is another plugin that allows you to customize the appearance of the Jenkins header. After installing, reach to the “Appearance section,” and there should be the below section added.

Now set a system message like “HELLO Jenkins”. You will see the changes in the header. Try different options.


