To keep ahead in the fast-paced world of today, efficiency is essential. It is critical for developers and project managers to remain up-to-date on the state of automated builds and deployments. Jenkins, an open-source automation server, is useful in this situation. Jenkins makes it easy for teams to stay informed with its powerful email notification system.
Table of Contents
Knowing Jenkins Email Alerts
Jenkins provides stakeholders with a thorough email notification system that updates them on builds, tests, and deployments. The system is adaptable to your project’s requirements, guaranteeing that the appropriate individuals are informed in a timely manner.
Configuring Jenkins Email Notifications
Jenkins makes it simple to start using email notifications. To configure your email notification system, first install and setup Jenkins Server and then login to Jenkins Server from a browser using admin privileges.
Configuration and verification using default Mailer Plugin
- Go to Manage Jenkins -> Plugins -> Install Plugins and search the ‘mail’. The below plugin should be visible.

- Now, go to Manage Jenkins -> Systems to configure the SMTP server and check the email notification section. You can configure your own SMTP server on your domain or the ‘Gmail’ SMTP server.
- Configuration with the ‘Gmail’ SMTP server.
- In the SMTP server section, provide ‘Gmail’ SMTP server:’smtp.gmail.com’.
- Type ‘@gmail.com’ in the ‘Default user e-mail suffix’ text box.
- Click on Advanced and select ‘Use SMTP Authentication’
- username should be some ‘Gmail’ mail ID.
- Password should be ‘App Password’ in the above ‘Gmail’ account.
- To create an ‘App Password’ in your ‘Gmail’ account, login to your Gmail account and go to the Security section.

- Click on the arrow key for ‘2 Step Verification’

- Go down, there is a section ‘App password’, click on the arrow key.

- Create an app password.

- A window with a generated password should appear. Copy the password; it will not be visible if you press ‘Done.’

- Now come to the Jenkins Email configuration section and provide the password
- Set port 465 in SMTP Port text box

- Now click on the ‘Test configuration by sending test email’ check box.
- Give the receiver’s email address and press the ‘Test Configuration’ button.

- The sender and recipient of the mail should both correctly send and receive it.
- To configure the email notification with their own SMTP server running on the default 25 port, the user needs to mention the SMTP server IP and the domain name.
- Now to verify the setting through a build, either create a new job or modify an existing job.
- Go to the ‘Add post-build action’ and select ‘E-mail Notification’.

- Select the recipient’s email address in the text box.
- If you click the question mark beside ‘E-mail Notification’, you can get the conditions under which recipients will receive an email.
- You can configure the ‘From’ email address from the Manage Jenkins -> System Configuration page, e.g., if you type automation@<domain_name> the address will be displayed in the email received; otherwise, “address not configured yet <nobody@nowhere>” will be displayed in the ‘From’ address.

- Below is the sample email.

Configuration and verification using the email extension plugin.
Sometimes users need to send a build report, like an HTML report, etc., as an attachment to the email. For this, there are different plugins available.
- Go to Manage Jenkins -> Plugins -> Available Plugins and install the ‘E-mail Extension plugin.

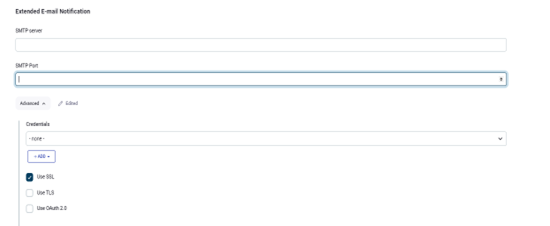
- Now configure the system configuration for this plugin. Go to Manage Jenkins > System. Search Extended Email

- Use the SMTP server IP, port, and credential for SSL. To use Gmail SMTP, you need to add the username and password as before.
- Type domain name in the ‘Default User email suffix’
- Choose Content type as per your preference (HTML or Text)
- Add Default Recipients as per your recipients list.
- There is a help button for each parameter. Please configure as per your environment,
- The below parameter can be kept as a default.

- Now it’s time to verify the setting with a sample job. Create a job, choose ‘Editable Email Notification’ from ‘Post Build Section.’

- Now attach the logs that are present in the workspace. Mention the file name and choose ‘Attach Build Log’ from the drop-down.

- You can add triggers as per your requirements. You can always choose to see the email for any condition, like passing or failing.

- Build the job and wait for the email. You can get the email with the attachment now. A sample email.

To learn more about the extended email plugin, please visit https://plugins.jenkins.io/email-ext/


